
Folding Smiles: How to Make an Origami Flower Bouquet
One of the reasons I love playing with form in writing and really appreciate my mom’s willingness to illustrate my collection of short stories When Magic Calls is because of my MFA class Text and Image.
In this course, we explored the variety of ways writing and imagery could be combined to create art. We looked at everything from comic books to collages to concrete poetry. Then we were challenged to find our own way of mixing text and image. I chose origami.
I’d already been folding as a hobby for years. Sometimes I folded a shape, then added the words to create a sculpture like this dragon. Other times I wrote the words on the paper and took pictures to create a visual representation of a story’s creation like with the rose.


That idea of form mimicking or adding to a story has stuck with me. You’ll see it’s influence in the structure of “Letters from a Wu” and “But the Fairy Tales Isn’t Over.”
How to Make an Origami Lily Bouquet
Steps Part 1 Images

I don’t put my stories on origami anymore, but I do still fold. The first shape I leaned how to make was an origami lily in order to create a paper bouquet for my mom for Mother’s Day. I’ve since given origami bouquets to too many people to count. Here’s how you can make one of your own.
Supplies
Square, thin paper. Thick or not square paper won’t work. The paper I used is 12” x 12”.
Straws or sticks
Feathers
Highlighter
Flower foam
A container
Craft glue
Steps Part 1
Fold the paper in half corner-to-corner. Make sure the plain side is inside the fold and the pattern is visible.
Crease well and unfold.
Fold the paper in half side-to-side like a hot dog bun. Make sure the pattern side is inside and the plain side is visible.
Crease well and unfold.
Bonus Pattern: When you’re not great at lining up your fold, the plain paper side will be very visible. I’ve discovered a pattern that makes this misalignment look really cool. Here’s how to create that.
Take a highlighter (these are best because they don’t bleed through like regular markers) and trace a stripe along the corner-to-corner fold you just made.
Draw three parallel lines on both sides of this line. (7 lines total) Use the hot dog fold creases as a guide to keep these lines within one quarter or one square of the paper.
Repeat on the other three sides. Your pattern should look like a big X.
Congrats! Now you have your bonus inside pattern!
Refresh the creases you’ve made if they are no longer crisp.
Steps Part 2
Start to collapse the paper (let it fold along the creases). Guide the side folds inside.
Take one corner and squash it down as evenly as you can.
Repeat with the other three corners. Now you should have a kite shape.
Take the edges of one corner and fold them in, so they touch the center crease of the kite shape.
Fold the top tip to the bottom tip and make a good crease.
Unfold the tips and sides you just did.
Pull the bottom corner up to the top corner, letting the paper fan out.
Guide the sides of the paper into the middle (they will want to fold there) and press the paper flat. Be gentle. Tearing is easy here.
Congrats! You’ve made a petal!
Repeat on the other three sides.
Steps Part 3
Take each petal and lift it up. There is already a crease, so this should be easy.
From the bottom tip (not the side with the four corners), fold the edges of one side in, so they meet in the middle crease.
Fold the petal down to form a crease and release.
Repeat on the other three sides.
Let the thin stem part relax as you pull each of the four petals down, so they are sticking out.
Take your highlighter or a pen and curl each petal down toward the stim. Curl it tight because some of the curl will relax out.
Congrats! You’ve a made an origami lily!
Look in the center. See how the pattern we created looks like a star inside the lily? Notice how that pattern pokes through the gap in the petals, making it look like the gap is meant to be there?
Steps Part 4
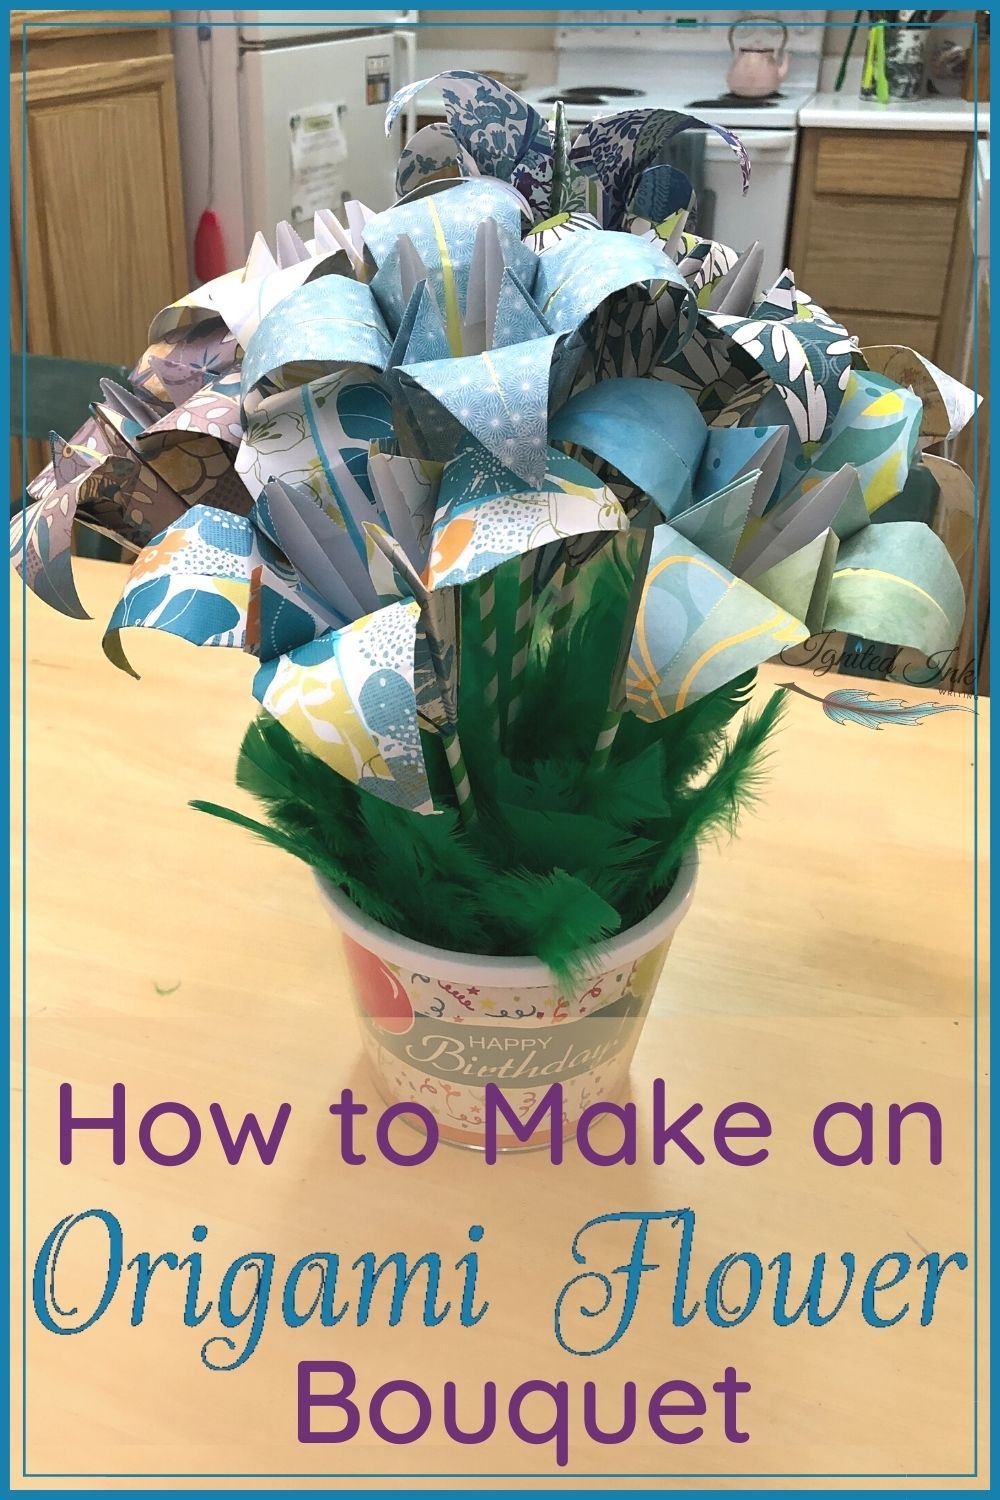
Make as many flowers as you need for your container. I made twelve.
Put the green flower foam in the container. Make sure it’s snug, so the flowers don’t flop over.
Push your stick through the tip of the flower. Or put a drop of glue in the tip of a straw and press your flower tip inside the straw.
Then stick the other end of the straw or stick into the foam in the container.
Repeat until all of the flowers are in the container.
Fill in the gaps with feathers to act as leaves or filler until you can no longer see the foam.
Steps Part 2 Images

Steps Part 3 Images

Steps Part 4 Images

Congrats! You’ve made an origami flower bouquet that is ready to give away!
I know that was a lot of steps, but look at how pretty these flowers turn out! If you’d prefer to follow along to a video, this is the one I used to learn how to make these flowers years ago. It doesn’t have my inside pattern instructions, though.
For smaller flowers, use smaller paper. I use 6” x 6” paper for smaller bouquets.
How did your origami flower bouquet turn out? Let me know in the comments or tag me on your social media pics. I’d love to see your creations!


Caitlin Berve is the author of When Magic Calls: A Collection of Modern Fairy Tales and currently working on a fantasy novel involving an arranged marriage, damsels who save themselves, and non-human shape-shifters. Through her company Ignited Ink Writing and MFA, she edits other people’s novels, creates video tutorials, teaches, and writes. Caitlin seeks to fill the world with the kind of writing that lingers with readers, pet all the fluffy and scaly animals she can, and find magic in modern times.